31 maart 2013

Vrolijk Pasen!


Normaal is mijn huis versierd met lentebloemen, paashazen en -eieren. Dit jaar staat er helemaal niets. We zijn zo druk met het nieuwe huis dat we maar weinig tijd hier thuis doorbrengen en ik had helemaal geen zin om alle decoraties boven te halen.

Usually my house is all decorated with Spring flowers, bunnies and lots of Easter eggs. This year, we have none of that. Because we're so busy rebuilding our new house, we spent little time at home and I didn't feel like decorating for Easter this year.


Maar, mijn favoriete paasquiltje heeft wel een plaatsje gekregen aan de muur, en natuurlijk gaan we deze ochtend een lekkere paasbrunch genieten. Want ik hou wel degelijk van Pasen en alle tradities en gebruiken die erbij horen!

Vrolijk Pasen!

But my favorite bunny quilt did get a place on the wall, and of course we'll enjoy a tasty Easter brunch this morning, because I do love Easter and the traditions that come along with it!

Hope you're all having a great Easter!

30 maart 2013

Label...


Het is altijd spannend als je het laatste stukje afwerkbies omnaait, want eenmaal dat dat vast zit, is je quilt klaar en kun je ervan genieten. Nou ja, klaar... bijna klaar, want er moet nog één ding gebeuren...

It's always thrilling to sew on the last part of the binding, because afterwards you can enjoy your finished quilts. No, not finished... almost finished, because I need to do one more thing...


Ik neem een klein stukje lichte stof, meestal een restje van de achtergrondstof. Hierop schrijf of borduur ik (afhankelijk van de quilt) de naam van de quilt, mijn naam en het jaartal. Ik appliceer het label op de achterkant van de quilt en voila...!

I take a small piece of light fabric, mostly a leftover piece of the background fabric. On this, I write or embroider (depending on the quilt) the name of the quilt, my name and the year. I appliqué the label to the back of the quilt and voila...!


Een label is niet noodzakelijk, maar ik vind het leuk om er voor elke quilt een te maken. Zo kan ik gemakkelijk terugvinden wanneer ik de quilt maakte. Sommige quilts waren zo klaar en bij andere zie je dat ik er een aantal jaar aan heb gewerkt. Maak jij een label voor je quilts?

Fijn weekend!

A label is not necessary, but I like to add one to each quilt. This way, I can easily remember when I made it. It's nice to see that some quilts were finished within a short period of time and others took years to finish. Do you add a label to your quilts?

Have a nice weekend!

27 maart 2013

Terugblik...


Terwijl ik bezig was aan ons nieuwste patroon (komt er binnenkort aan!) bedacht ik me dat ik doorheen de jaren al heel wat quilts heb gemaakt. Sommige zijn groot, andere klein, sommige zijn in patchwork, andere in applicatie,...

While working on our newest pattern (coming soon!) I realised that over the years, I made quite some quilts. Some large, some small, some in patchwork, some in appliqué,...


En dat maakte me benieuwd: waar was ik 5 jaar geleden aan bezig? Het was 'Home Is...', het eerste quiltje van de Mini Quilt Club, die in mei 2008 van start ging. Ik kan het haast niet geloven dat de Club dit jaar al zijn 5e verjaardag viert! We zijn nog lang niet uitgekeken op het maken van die kleine quiltjes en ondertussen hebben we al een flinke stapel mini's 'verzameld'. Maar, van heel die stapel, heeft dit quiltje voor mij toch wel een speciale betekenis. Het was immers de start van 5 jaar (en hopelijk nog veel meer!) 'mini-plezier'!

Veel quiltplezier!

All of a sudden, I was curious: what was I working on 5 years ago? It was 'Home Is...', the first quilt for the Mini Quilt Club which started out in May 2008. Can't believe the Club is celebrating it's 5th aniversary this year! We still love making those small quilts and we have collected quite a pile of mini's over the years. But out of them all, especially this first mini quilt is special to me, just because it was the start of 5 years of mini fun (and more to come!). 

Happy quilting!

25 maart 2013

Koud...


Met al die sneeuw ziet het geïmproviseerde bankje dat de bouwvakkers in onze tuin maakten er niet zo uitnodigend uit als een paar weken geleden, toen het zulk heerlijk lenteweer was.

Because of the snow, the makeshift bench the construction workers made in our garden didn't look as inviting as it did 2 weeks ago, when we had a few lovely Spring days.


Maar eigenlijk heb ik ook helemaal geen tijd om te gaan zitten! Want nu de vloeren droog zijn en de muren waar nodig van nieuw bezetsel zijn voorzien, begint ons huis er weer bewoonbaar uit te zien.

But actually, there's no time to sit down at all! Now that the floors are dry and the walls have new plaster where needed, our house is starting to look habitable again.


Behalve dan dit lelijke ding... Het is een enorme vochtplek op de muur in de woonkamer en ik word er triest van als ik het zie. Het kwam tevoorschijn toen we het behang eraf trokken en was daarvoor goed verstopt achter het papier. Grrr... We vermoeden dat het vocht uit de tuin komt - die er momenteel meer uitziet als een moeras dan een tuin met een gazon - en zo de muur intrekt. Het feit dat er al enkele weken geen verwarming meer is (het is binnen 3 graden) helpt natuurlijk niet echt mee... Vanavond komt er een vochtexpert kijken. Hopelijk kan hij ons vertellen hoe we het kunnen behandelen.

Except for this ugly thing... It's a huge damp place in our living room wall and the sight of it really makes me sad. It came out when we removed the wall paper and couldn't be seen before. Grrr... I think it's coming from the garden - which at the moment looks more like a swamp than a lawn - right into the wall. The fact that there's no heating in the house for already a few weeks (it's 3 degrees Celsius inside) doesn't really help... Tonight, we will have an expert coming over to take a look and to, hopefully, tell us how to treat it. 


Ondertussen ben ik begonnen met het verwijderen van de verf van de raamkozijnen. Het is veel werk, maar het moet gebeuren. Ik hou in gedachten dat over een paar maanden alle rommel, stof en andere vuiligheid weg is. Intussen houden Alicia en ik de stemming er tijdens het werk goed in ;o)

Fijne maandag!

In the meantime, I started removing the paint from the window panes. It's a lot of work but it needs to be done. I keep in mind that in a few months all mess, dust and other rubbish will be gone. Meanwhile, Alicia and I keep up the good work ;o)

Have a nice Monday!

23 maart 2013

Fray Check...


Ik ontving verschillende vragen op mijn blog, alsook per mail, over de Fray Check die ik gebruikte om de bloempjes te appliceren, waar ik onlangs over schreef. Ik kan iedereen persoonlijk per mail antwoorden, maar het leek me beter om hier wat meer uitleg over het product te geven, zodat iedereen het kan lezen.

I received many questions on my blog as well as by e-mail about the Fray Check I used in my recent post about the appliquéd flowers. Instead of answering you all by e-mail, I thought it best to write about the product here, so it's open to all of you to read.


Fray Check lijkt op hobbylijm. Het kan gebruikt worden voor zowel het traditionele (onzichtbare) appliceren, alsook voor het appliceren met vliesofix. Bij de eerstgenoemde techniek gebruik ik het om de stof te verstevigen op de plaatsen waar ik het inknip tot de naailijn, zoals in het 'putje' van een hart. Het 'lijmt' als het ware de draden aan elkaar, zodat ze niet gaan rafelen als je het vastnaait.

Fray Check looks a bit like hobby glue. It can be used for both traditional appliqué and fusible webbing appliqué. For the first technique, I use it to strengthen fabric wherever I clip it towards the seam allowance, like in the nick of an appliquéd heart. It kind of 'glues' the threads together, so they will not fray while sewing.


Voor het appliceren met vliesofix, gebruik ik het om alle kanten van de te appliceren delen te verstevigen. Allereerst strijk ik de vliesofix tegen de achterkant van de stof en knip ik alle delen op de lijn uit. Vervolgens verwijder ik het papier en smeer ik alle randjes in met Fray Check. Zo zijn de randjes stevig en zullen ze niet rafelen eenmaal dat je ze met de festonsteek op de achtergrondstof bevestigd. Meestal prik ik de onderdeeltjes op een speld, zodat ik zelf niet helemaal onder de Fray Check zit. Bovendien kan ik het zo gemakkelijk laten drogen. Als het eenmaal droog is, zijn de deeltjes klaar om op de achtergrondstof gestreken te worden.

For fusible webbing appliqué, I use it to strengthen all sides of the appliquéd parts. First, I iron the vliesofix (double sided interfacing) onto the back of the fabric and I cut the templates. I then remove the paper part of the interfacing and I put Fray Check onto all the sides of each template to avoid the fabric to fray once I secure it onto the background fabric with a blanket stitch. I mostly pin the parts on a straight pin, so I'm not all covered with Fray Check and to let them dry. Once dried, the parts are ready to be ironed onto the background.


Maar let op: gebruik niet teveel Fray Check, want het maakt de stof wel stijver dan normaal. Je gebruikt dan ook best een naald met een scherpe punt om te appliceren, zodat je gemakkelijk door de stof gaat.

Mind you: don't use too much Fray Check, because it does make the fabric much stiffer then usual. You best use a needle with a sharp point, so you can get through the fabric easily.


Oh, en trouwens, Fray Check is verkrijgbaar in de meeste quiltwinkels. Als het niet voorradig is, kun je altijd vragen of het besteld kan worden. Meestal is dat geen enkel probleem!

Oh, by the way, Fray Check is available in most quilt shops. If they don't carry the product, you might ask if they can order it. Most of the time, that might be no problem!

21 maart 2013

Lente...?


Als je naar buiten kijkt, en een bevroren wereld met zelfs een klein beetje sneeuw ziet, geloof je het misschien niet, maar vandaag is het de eerste dag van de lente!

You might not believe it when you look outside and you see a frozen world, covered with a tiny bit of snow, but today really is the first day of Spring!


Ondanks dat ik hou van de winter, sneeuw, sneeuwmannen en al de rest, verlang ik nu toch wel naar een lentezonnetje.

Eventhough I love Winter, snow, snowmen and all that comes along, I do long for Spring now.


Daarom laat ik je vandaag mijn nieuwste Mini Quilt zien - een gezellig boeketje lentebloemen, 'grown with love' met mijn favoriete stofjes - om je wat lentekriebels door te sturen.

Fijne lente!

Therefore, today I show you the latest Mini Quilt - a lovely bouquet of Spring flowers, 'grown with love' from my favorite fabrics - to send you a little bit of Spring.

Happy Spring!


18 maart 2013

Bloempjens...


8 bloempjens en 16 blaadjes zijn behandeld met Fray Check en zijn nu aan het drogen op mijn speldenkussen... Als ze droog zijn krijgen ze een plaats op mijn mini quiltje.

Veel quiltplezier!

8 flowers and 16 leaves are handled with Fray Check and drying on my pincushion... Once dried up, they will be placed on my mini quilt.

Happy stitching!


17 maart 2013

Gewoon, een zondagochtend...


Gewoon, een zondagochtend. Dit weekend wordt er niet in het nieuwe huis gewerkt, want de vloeren zijn nog niet droog. Ik heb eindelijk tijd om ons appartement wat terug op orde te brengen, want dat is er met alle verbouwingen de laatste tijd wat bij in geschoten.

Just a regular Sunday morning. No working in the new house this weekend, because of the wet floors. I finally have time to clean our appartment again, because with all the renovating going on, I nearly didn't have time for that.


Dus vanochtend geef ik eerst de badkamer een beurt, steek ik een was in de machine en stort ik me op de afwas die er nog staat (ik kan niet wachten tot ik mijn nieuwe afwasmachine heb! LOL). Daarna vind ik vast nog wel tijd om wat steekjes te doen aan de piramidequilt. Misschien lukt het zelfs om er een nieuwe rij aan te naaien.

Fijne zondag!

So this morning will start with cleaning the bathroom, doing some loundry and taking care of the pile of dirty dishes (I really long for my new dishwasher! LOL). After that, I'm sure I'll find some time to work on the pyramid quilt and maybe even add another row.

Have a nice Sunday!

13 maart 2013

Over sneeuw en hard werken...


Kijk wat een prachtig uitzicht we hadden vanuit onze woonkamer gisteren. Normaal zouden we tijdens een winterwandeling genieten van de sneeuw en de ondergaande zon, maar daar hadden we gisteren geen tijd voor, want er moest nog gewerkt worden!

See the lovely view we had from our living room yesterday. The snow and the sunset are usually something we would enjoy during an evening walk or so. But not yesterday, since some work had to be done!


De elektriciën en de loodgieter zijn voor nu klaar met hun werk. We moesten alles grondig schoonmaken, want vandaag komen ze de betoncementvloer 'chappen'. Hopelijk zit het vriesweer niet tegen en kunnen ze ermee aan de slag gaan. Ik zou graag ons huis wat meer 'af' zien, want zoals het er nu uitziet kan ik me niet voorstellen dat we er over 2 maanden in kunnen gaan wonen... ;o)

Fijne dag!

The electrician and the plumber have done their work so far. We had to clean each room thoroughly, because today they will start with the floors (the layer that comes above the concrete and the pipes. We call it 'chape'). Hopefully the weather won't get in the way. I really would like to see our house more finished, because in the state that it's in now, it doesn't look like anything we could live in in 2 months... ;o)

Have a nice day!

10 maart 2013

Stemmetjes...


Soms hoor ik stemmetjes mijn naam roepen: Ellen... Ellen... Ellen...

Sometimes I hear voices calling my name: Ellen... Ellen... Ellen...


Meestal fluisteren ze, maar hoe meer ik ze probeer te negeren, hoe luider ze beginnen te klinken.

Most of the time, they speak only softly, but the more I try to ignore them, the louder they start to sound.


Het zijn stofjes, die mijn aandacht proberen te trekken. Ze willen immers dolgraag in een nieuw quiltje verwerkt worden!
En wees eerlijk, wie kan nu zo'n roep weerstaan? ;o)

Fijne zondag!

They are fabrics, trying to get my attention, because they desperately want to be used in a new quilting project!
Now be honoust, who can resist such a call? ;o)

Have a nice Sunday!


8 maart 2013

Quilten...


Tussendoor het verbouwen, ben ik bezig aan mijn Shades of Summer quilt. Die ziet er momenteel niet uit, helemaal blauw van de uitwasbare stift... Brrr... Ik vind het er niet uitzien, dat blauw, maar het is wel een heel handige manier om de quiltpatronen duidelijk op de top over te brengen.

In between renovating our house, I'm working on my Shades of Summer quilt, which looks so ugly right now, all covered in blue marker... Brrr... I don't like the sight of the marker, but it sure is a good way to draw the quilting patterns on.


Ik ga twee harten in elk van de blokken quilten en een veer-achtig motief in de rand. Normaal kies ik makkelijke quilt-as-you-go patronen, waarbij je gewoon door kunt quilten en niet elke keer moet aan- en afhechten. Maar ik vond de hartjes zo leuk dat ik daarvoor een uitzondering heb gemaakt. Welk soort patronen quilt jij het liefst?

Fijne dag!

I'm going to quilt two hearts in each of the blocks and some feathery thing in the border. Normally I try to choose an easy quilt-as-you-go pattern, in which I don't need to secure my threads too many times, but I loved the hearts, so I made an exception on this quilt. Which kind of quilting patterns do you prefer?

Have a nice day!


2 maart 2013

Zandkasteel...


Je herinnert je wellicht nog wel dat ik schreef over de vloeren in ons nieuwe huis. Die lagen niet waterpas en in de badkamer en keuken lagen verhoogjes die eruit moesten.
Onze eerste gedachte was om dat zelf te doen: de vloer ligt immers op zavel, dus de tegels zouden hier eenvoudig uitgeschept kunnen worden, gewoon, met een spade en wat spierkracht.

You might remember the post about the floors in our new house. They weren't perfectly leveled and in the bathroom and kitchen were platforms installed, which had to be removed.
Our first thought was to do it ourselves: since the floors were layed on sabulous clay, all tiles should be easily removable with just a spade and some hard work.


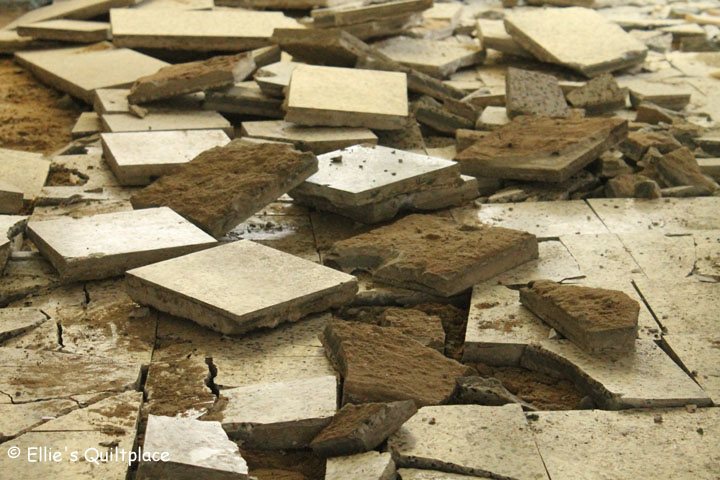
Wat we niet verwacht hadden, was dat de stenen goed verankerd lagen in een dikke laag cement... Tot zover dus het plan met de spade... De vloer-mannen (die maandag het beton komen storten) waren zo vriendelijk om een gaatje in hun agenda te vinden en de tegels te komen breken. Zo moesten wij ze alleen nog maar verwijderen en de vloer uitgraven.

What we didn't expect, whas that the tiles were anchored in a thick layer of cement... So far for the spade-method to remove them... The floor-guys (who will fetch our concrete floor next Monday) were so kind to find a free spot in their agenda to break the tiles. All we had to do was remove them and dig out the sabulous clay.


Dus gisteren maakte ik een lunchpakketje en een grote thermosfles thee klaar en ging ik aan de slag. Philippe had een vergadering in Brussel, maar wie zegt dat een meisje dit niet kan?!

So yesterday I took my lunchbox and a huge thermos with tea and got started. Philippe had a meeting in Brussels, but who says a girl can't do the job?!


Dit is een kijkje in onze badkamer, nog voor ik aan de slag ging...

Here's a picture of our bathroom, just before I got started...


... en dit is onze keuken. Prachtig, vind je niet? ;o)

...and this is our kitchen. Looks lovely, don't you think? ;o)


Na een paar uur flink te hebben doorgewerkt, was er 60 m2 vloer verwijderd. Er ligt nog wat kleine rommel, maar dat doen we vandaag, net zoals het uitgraven van 30 cm zavel uit de woonkamer en keuken.

After some hours of hard work, I finally got the 60 m2 floor out. Just some scratch is left, but we'll do that today, aswell as removing 30 cm of sabulous clay from the living room and kitchen.


Dit is het zicht vanuit de gang. Het lijkt wel of we in een groot zandkasteel wonen!

This is the view from our hallway. It looks like we're living in a huge sand castle!


Na dit weekend beginnen we met opbouwen in plaats van afbreken. Daar ben ik blij om, want dat betekent dat we weer een stap dichterbij ons droomhuis zijn!

Fijn weekend!

After this weekend, we'll get to start on rebuilding instead of demolishing. I'm glad, because that means we've come a step closer to creating our dreamhouse!

Have a nice weekend!


1 maart 2013

Nog 'n keertje...


Naar aanleiding van mijn berichtje over de Old Glory Doll Quilt, ontving ik van een aantal lezers een bericht of het mogelijk was het patroon voor dit quiltje uit te werken. Het is een eenvoudig quiltje, wat je waarschijnlijk zo natekend als je goed naar de foto kijkt, maar ik geef jullie er helemaal gelijk in: het is veel makkelijker en leuker om eraan te werken met duidelijke instructies erbij.

In order to my post about the Old Glory Doll Quilt, some readers e-mailed me if it was possible to write the pattern. It's an easy project, which you can draw yourself if you take a close look at the picture, but I know: it's much easier and more fun to work on, with some clear instructions to follow.


Alles wat je nodig hebt om aan de slag te gaan is een Mini Charm Pack en een bijpassende Fat Quarter voor de afwerkbies. En natuurlijk ook wat achterkantstof, tussenvulling en de gebruikelijke quiltmaterialen. Heb je nog geen Mini Charm Pack? Stuur dan Jacqueline even een mailtje op info@thelogcabin.de om er een te bestellen. Zij heeft in haar winkel een grote mand met Mini Charm Packs waar je uit kunt kiezen, zoals Old Glory Gatherings (die ik voor dit poppenquiltje heb gebruikt), Double Chocolat, Tapestry en Metropolitan Fair. Ze zijn gewoon veel te schattig en... ze kosten maar 4,95 euro! Nu begrijp je waarom ik er hier al een aantal heb liggen ;o)

All you need to get started is a Mini Charm Pack and a matching Fat Quarter for the binding, aswell as some batting and backing and your regular quilting materials. If you haven't have a Mini Charm Pack, just e-mail Jacqueline at info@thelogcabin.de to order one. She has a huge basket of Mini Charm Packs in her shop to choose from, like Old Glory Gatherings (which I used for this doll quilt), Double Chocolat, Tapestry and Metropolitan Fair. They're just too cute and... they only cost 4,95 euros! Now you know why I have already bought many of those ;o)


Om het patroon te downloaden ga je naar onze website (klik) en klik je op de Freebie knop.

Veel plezier ermee!

To download the pattern, please visit our website (click) and click the Freebie button. If you prefer to work in inches, you can download a Metric Equivalency Chart here.

Happy sewing!

Related Posts Plugin for WordPress, Blogger...